Tuesday 25 February 2014

Faux Washi Tape

I have really enjoyed and welcome all the ideas from Pam Thorburn this week and tonight's challenge really jumped out at me. I have never made washi tape before and the drippy background is my kind of messy.
I began by painting the masking tape, didn't have any double sided so passed on adding tissue. Next I stamped with black archival.
I watered down my frescos and sprayed and dripped the colours. they didn't always go where I wanted
them to so helped a few along. I did some stamping and arranged the faux washi tape.

I mounted my photo onto black card and then doodled around it in black and white pens to make it stand out. did a little more doodling with white pen, added lettering and a little bit of writing.
I am happy with my page and would like to thank Pam for such an enjoyable play!

Dina Wakley Birds

I love my garden and the birds that visit so it was a perfect time this afternoon after tidying the garden in the sunshine, to start a new project using Dina Wakley's bird stamps.
I began by randomly spraying Dylusion inks; spraying through stencils and printing the reverse to create a background. Next I stamped numbers and circles using PA fresco Orchid and Snowflake.
I am getting braver with my own handwriting and scribbled away with a Black Promarker and White Uniball Signo.
I stamped the birds onto book pages and coloured and washed them with Inktense crayons.
I cut them out except for the fiddly legs, restamped them onto the page and glued them back onto their legs.
I have started a collection of pieces of text cut from magazines and OUT OF DARKNESS COMES LIGHT seemed appropriate for this particular day, so that was added too.


Sunday 23 February 2014

Ellen Vargo card set.

I was really excited to see and buy Ellen's new stamps. the possibilities for playing are going to be limitless, so thanks Ellen.

I started by painting a layer of Snowflake onto my card and then brayering Lin Brown's new collection of colours. I also added the same paint to a random stripy envelope that was lying around next to my craft mat as I didn't know where my work was heading and it gave me an extra option.
I decided to add some extra colour, Autumn Fire to my mix.

Next,I printed on my background and the envelope with one of the sketchy stamps.

I cut out some shapes from the envelope and added them to the main piece. It gave it a bit more interest.
I decided not to cut it up at this stage but to carry on with random printing and see where it took me.
Finally, I chopped it up, added black and white pen, stamped some words, added wools etc and mounted up to create a card.
This is the first of many exciting plays with Ellen's stamps. loving them!

Thursday 13 February 2014

A pocket of hearts.

As some of you know I am enjoying joining in with the Documented Life Project. Week 7 challenge was to produce something with a repeated shape. I saw that someone had make a pocket of hearts and I adapted it to my own style.
Well its Valentines Day tomorrow so I chose the heart. Also I wanted to use my sewing machine.

I started by covering a piece of card with calico and dampened it and sprayed with bright Dylusion inks. Next I stencilled hearts onto the background and stamped with Darcy's little heart. I also sprayed another piece of calico for the pocket.
I cut out several hearts from bits and bobs of paper and stitched them to the background and the pocket.
Added a bit of lace and assembled my page.
I made a few extra hearts to go in the pocket, glued on some gem hearts and sprayed it with sparkle.
Just in case Sam reads this part of my blog….sorry for it being so pink!
Thought that I should add a close up.

Julie Ann Suitcase 2

I am so grateful to Julie Ann and PaperArtsy for embarking me upon a wondrous adventure. I have loved where this project has taken me with my little red suitcase.
I decided to fill my case with many of the little battered photos that were taken of me and my family years ago. it would be a good place to store memories and to pass on to my grandchildren.

I made a concertina book out of card and painted and stamped onto it with fresco neutrals and PA stamps.
I filled it with photos and details. Simply mounted on black card as the photos speak for themselves.
I decorated the cover and added one of Lin Brown's new sentiments.

I had already painted the inside of the case with Fresco Chocolate Pudding and I now added PA papers with additional PA stamping to the inside….you will see a piece of ribbon inside which pulls up to reveal a secret place for more photos and notes.
So my album nestles neatly in my suitcase and I am thrilled with my project….Thankyou Julie Ann.

Tuesday 11 February 2014

Julie Ann Suitcase 1

I had the pleasure of meeting Julie Ann Lee on Sunday at Stamperama and she was every inch the lovely lady that I had imagined her to be.
So, on arriving back home, there was part 1 of another of her stunning projects.

I didn't have a suitcase, so I improvised (sorry Leandra); but I redeemed myself a bit by using grungepaper to make the straps. With a drop of glue here and there and some screwlike brads I achieved the desired effect.
Next, I had a good think about where my suitcase was going and decided to resurrect the suitcase that I owned as a very little girl. It was small, made out of cardboard and probably pale blue….and when I decided to run away when I was about 4 or 5, I packed (just my teddy!) and walked down the path!!
Cant remember what happened next but that was as far as I ran.
ANYWAY…as I said, it was most probably blue but I would have liked a red one so it is now red and the straps are blue. I painted the inside with Fresco Chocolate Pudding, the outside London Bus and the straps with Lake Wanaka.
Like Julie Ann, I aged my suitcase with French Roast. Next I stamped some script to give it character; painted my old initials in Gold and doodled on it with both black and white pens. I drew my teddy, and the hopscotch that we used to play; wrote my address and did some sums.
Next I painted it with gloss medium as my suitcase used to be shiny. Some of the doodling smudged but that was ok. I rubbed on some treasure gold and painted TG onto the screws.
Finally I stamped PA stage lights onto some tags, crayoned onto the images, distressed them and tied them and tartan ribbon onto the case.
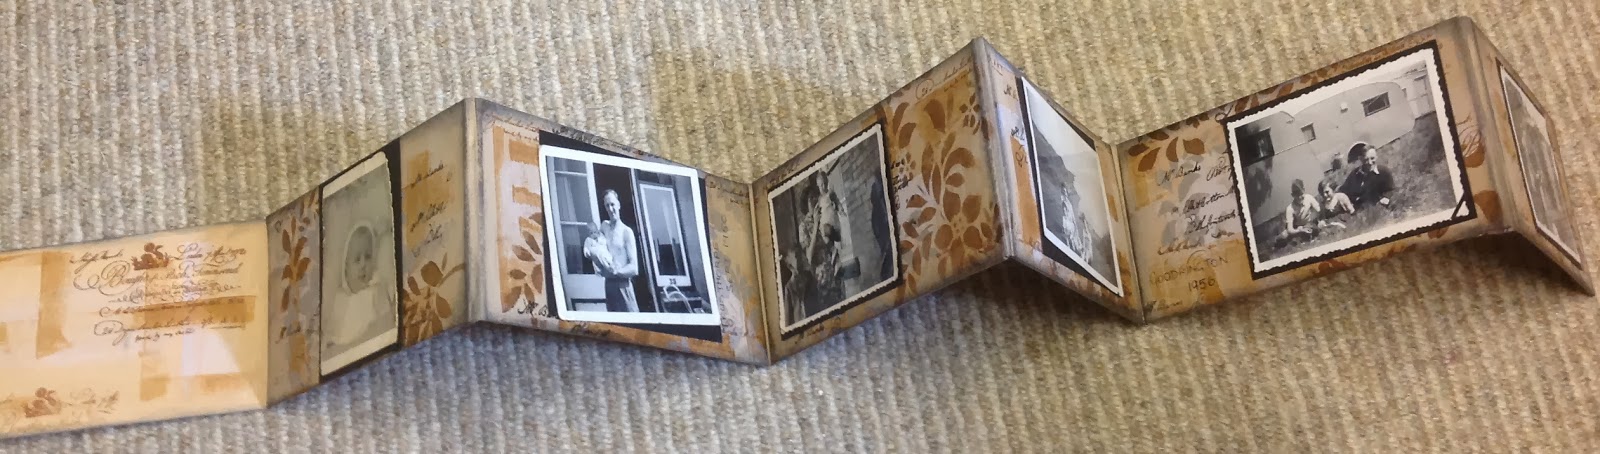
My next project will be to make a book of memories with photos of me and my family to go inside the case.
Thankyou Julie Ann for igniting the spark!!

Saturday 8 February 2014

Ellen Vargo, Blazonry Stencil design.

Ever since I came across Ellen Vargo's work on PaperArtsy as a guest designer I have been a big fan. I now follow her blog and have been inspired by her use of a particular stencil by Julie-Fei-Fan Balzar.
It features the use of reduction, which is wiping off paint through the stencil.

First I applied layers of Fresco paint with the brayer. now and again I wiped off the paint through the stencil or added paint by dabbing through the stencil.

Next I stamped with Dina Wakley's "Create with Abandon" stamp in olive, and coffee archival. I used the stencil as a template, drew and cut out several of the shapes, inked the edges and glued into position.
I used Dina's stamp again in black to feature and frame the piece.
I distress inked around the work and finally added some lace as the work seemed to be lacking something.
I am now pleased with the finished result.
Thanks Ellen for yet more inspiration.


Tuesday 4 February 2014

Clare Lloyd 3 Make a face

I was so pleased to find instructions from Clare about drawing and colouring cute faces. I have been practising drawing faces recently and got bogged down with my efforts to make them look real. I can incorporate this style into some of the work from previous Design weeks, like the brayering.

I started off following the video and needed to keep refreshing to make sure that I was doing it right. Found the instructions really easy to follow. I used Toad Hall for the eyes and Autumn Fire for the hair. I really enjoyed the pencil crayon bit too, something that I haven't combined before.

For my tag I decided to use the same colours, including Rose, as the mouth was in Rose. So I painted broad brushstrokes of my 3 colours and used the same paint to decorate the dress. Then I stamped a few words and some Darcy hearts and Distress inked in Olive around the edges.

I stamped some more Darcy hearts onto card and colour washed over them and glued the figure and the hearts to the tag. By this time some people were remarking on the resemblance to someone that we know. This was unintentional!

This tag has a little twist because the saucy minx is hiding behind her demure Day dress and can reveal that she is really ready to PARTY!!

Sunday 2 February 2014

Darcy Journalling 1

I am a massive Darcy fan; I know that I am one of many and was keen to have a go at the journalling challenge that will run once a month. It is good to try different approaches and one that is Darcy led will be an adventure.
I started in my new square journal by taping and Grunge pasting as instructed. good job that I read instructions over and over as I was thinking that you let this dry before removing the tape, but of course that would have been early disaster. I stamped into it for added texture.

I added all the layers of Fresco paint as instructed, ending with a neutral shade. I left the edges free so that a hint of the colours would show.

I sanded down the grungepaste and rub, rub, rubbed the flat areas with a baby wipe over various stencils. I rarely got down to the first coat as the page started to disintegrate in places. 
NOTE TO SELF..Put layers on more thickly next time. 
Also I couldn't resist rubbing a bit of Treasure Brass here and there.

As you can see, I stamped with JOFY stamps; drew and cut out a silhouette; added a bit of paint here and there; highlighted with gell pen and finally drew some seeds heads floating around.
So month 1 of Darcy's Journalling is complete. If I wanted to extend it further, I could always go back to it and add some dimension by cutting out flowers but today I ran out of steam!!
I have enjoyed the challenge and stored up ideas for future use. Thanks Darcy!

Saturday 1 February 2014

Gillian Simson Challenge

It was brilliant on Friday evening to find that Gillian had created a stunning piece of work for us. I love the vibrant colours and the fun that she had incorporated into it. With Darcy's stamps then the fun can be endless as they look so exciting.BUT we haven't got them yet, so thinking cap went on.

I didn't have any board so decided to use a PA carrier bag with my postcards and JOFY stamps.

First I reluctantly tore up some postcards and arranged them on the bag.

I stuck them down and applied a watered wash of Snowflake fresco.
Next I painted lightly over the outside border of the bag with bright fresco paints, all of which were translucent; meaning that you could still see the postcard images, which is what I wanted. I stamped  a JOFY border and used the dragonflies. I used the same colours to highlight bits of the border. 
Frescos..Yellow Submarine, Tango, London Bus, Limelight and Beach Hut.


Because Gillian's had a sort of circus feel to it, I decided to make a unicyclist out of bits of JOFY stamps. a bit like making the soft toys a few weeks ago.
I stamped with black stazon onto acetate and painted with same fresco paints on the back. This is the reverse.

I made a tag using a PA sentiment stamp; attached the acetate using brads and Hey Presto, my carrier bag became a piece of art and I hung it on the wall. Bit mad but have really enjoyed the project. Thanks Gillian for an exciting and lively piece of work to set the creative cogs whirring!!