Sunday 19 February 2017

30 minute challenge


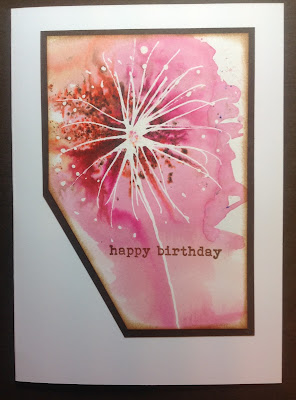
Here is my second piece for Country View Crafts challenge, to create something in 30 minutes or less.
I started with some sturdy, mixed media paper from a pad and, using Christine Adolph Adhesive rub ons, added coppery toned gilding flakes.
Next, I sprayed the surface lightly with water and sprinkled some Infusions, Golden Sands and Orange county sparingly.
I stamped the image with Black Archival. She is Paperartsy minis MN10.
To finish, I blended some Distress inks, Vintage Photo, Victorian Velvet and Frayed Burlap.
Gold leaf pen edging and mounted onto Brown card before adding to my Kraftcard.
Products Used:-

Thursday 16 February 2017

Hollyhocks


Over at RubberDance Stamps challenge, the theme is layering. Here is my entry.

This came about just by playing, which is all the sweeter when experiments make you smile.

I began by sprinkling layers of brushes in columns going down my page, spraying with water and dipping Dyan Reaveley border stamp into the colours and stamping randomly.


It reminded me of tall flower borders , so I decided to develop it.
I stamped with various colours of archival ink, building up my layers and added a couple of leaf stamps, colouring the leaves with watercolour crayons to build up the layering.
To finish, I dotted some Stickles to suggest flower buds or water droplets that reflected the sunlight. 
Happy Summer Days to come! 


Monday 13 February 2017

Dream Big


I made 2 New Year Resolutions, both of which I am still keeping. One was, wear the clothes that I have and stop buying more, the other, to enter more challenges.
So, here I am entering the Rubber Dance Stamps Challenge.
The theme is colours, Pink, Green and Grey. Love them.

I began in my repurposed Girl's annual and added some music pages. I drew my face shape and filled in with PaperArtsy fresco vintage lace. After this I used  combination of frescos, gelatos and Slick stix to shade and form the face.

As I painted I added some of the colour to the background.
Next, I went to some of my previous artwork which I had printed out for cutting and adding.


It has lots of flowers from Emma Godfrey's beautiful PaperArtsy stamps. I cut three out to add to my girl's hair.

Finally, I stamped something that seemed appropriate to someone with the world at their feet.
Really enjoyed this one.


Sunday 12 February 2017

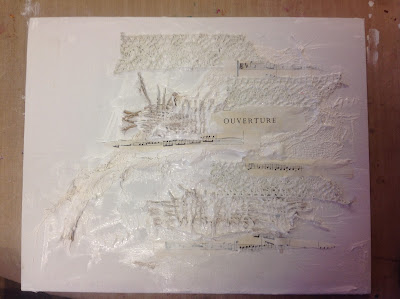
Ouverture


When I saw Ingrid Vichova's creation on the PaperArtsy blog this week, it spoke to me. There was something very special about all the glorious colours and the luscious layers. It is pretty far removed from my usual style, but I really wanted to have a go.
So, I reread her post and made notes and scuttled off to find some supplies.
I worked on an Acrylic Paint Board, which seems very similar to canvas but is flat.
Here are my first layers.


The word Ouverture, fell out of my music book as I took it from the shelf, so it had to go in!

I didn't intend my finished piece to be so neutral, but, that is where it led me.
Here is the finished piece.


And another close up.


Always feel a bit bad at entering the PA challenge so many times, but I am a quick and enthusiastic crafter!


Friday 10 February 2017

I heart you


Over on the That's Crafty blog its all about hearts. So I decided to join in.

I began on very strong Mixed Media paper which is A4 and, using Emma Godfrey's delightful and very well used stamps, I stamped and heat embossed with white embossing powder.

Next, I gave it a wash with some Infusions and sprayed and sprinkled some more Infusions, dabbing as I went to control the intensity.
I stamped with a small script stamp and added a few Perfect pearls dots.


To finish off I stitched around the edges, gave an infusion wash border and a little inking with black soot. 
It's too big to be a card but I just enjoyed playing.

Thursday 9 February 2017

Texture, crackle and paint!


Over on Stamps and Stencils, the topic is Texture, Crackle and Paint. So here is my entry.
In my Repurposed old book I gessoed, and using Lin Browns' new stencil, applied some crackle paste. I then painted the whole page with a selection of neutral shades of Fresco paint, and when dry, sanded back my crackle paste.
I then created a crackled effect by painting some Mocha Mousse fresco paint onto my Crafty Individuals crackle stamp and applied randomly.
Then with a Donna Downey stencil and Coffee Archival Ink, I added some words. 
To finish, I darkened around the border and added some perfect pearl accents to the seed heads.


Wednesday 8 February 2017

Masking fluid times 3.

Cant help being like a dog with a bone. After such wonderful inspiration on the PA blog about Masks, I just get stuck in!

After my previous "Kluttish" (is that a real word?)...attempts at masking, I feel that I have at last achieved the nearest to finesse that someone like me will ever achieve.

I worked on my A4 Mixed Media pad and drew some cow parsley with a wooden skewer dipped into masking fluid. When dry, which took ages, I gave them a wash with infusions and then sprinkled more into the centres. Here is the exact moment!


After they were dry, I peeled off the masking fluid, chopped them up, inked around the edges and made them into Birthday cards. I must admit that I love them and won't ever want to give them away! 
I need to enter them into the PA challenge, not to win, but to show other people another take on masking! 😊


More masking fluid experiments


Yesterday, I experimented with different ways of drawing with my masking fluid. Having decided that a wooden skewer is my best bet, I set to in my Mixed Media pad, A4, and drew some natural forms.
When I sprinkled Infusions on yesterday, I noticed that finer detail was lost, so today, I used the infusions mainly as a wash, just sprinkling a few extra bits on at the end. 
Maybe I should have not done any shadow work with black pen, it does look a bit clumsy, but, it is an experiment, not a finished work of art!
Here is my fave bit in close up!


Joining in with the PA challenge! 


Tuesday 7 February 2017

Masking fluid experiments.


Over on the PaperArtsy blog at the moment , the topic is Masks.
Being a bit stupid, I first thought of the Masquerade variety, but having watched Darcy's wonderful intro, I now know better!

I have used masking fluid once, to mask off the drawing of a hen that I did, but tonight I wanted to draw a seedhead.


This is how it goes........

1. Seedhead drawn with a fine brush dipped into masking fluid and then, when dry, infusions added.


Looks clumsy and I had to Google how to clean my brush as it was a mess. Not to be repeated! Tip was to coat the brush in washing up liquid first to avoid coating with rubber.

2. Seedhead drawn with a dropper that is left over from expensive eye serum...well a girl has to have these things!


Still clumsy but slightly better and the fluid just washed straight off the dropper. 

3. Seedhead drawn by dipping a wooden skewer into the masking fluid. I like this one!


Some of you experienced artists out there might be thinking....what is she on about. But for me it was a valid experiment. Hope that it is useful to a few others too! I will develop my findings!

Entering this into the PA blog. 


Sunday 5 February 2017

Vintage Face.


I wanted to join in with the new A Vintage Journey challenge where we include Words That Are Special. I am in a bit of a face frenzy at the moment, so decided to link this into their theme.

I began by gessoing a page in my Girl's Annual and drawing a face from a magazine. I used Black Stabilo pencil.
I have included this photo which shows how I drew the eye on the right 3 times before I felt that the position was right. Nice to see mistakes rectified I think.


I went over the pencil with a watery wash and dabbed some of the pencil where it was too dark. 


I added some strokes of PaperArtsy fresco paints in Stone, Mocha Mousse and Irish Cream and stamped the sentiment which is from Lin Brown.   And painted over the badly stamped sentiment and eventually got it sort of right. Little bit squew-iff!

To add a vintage feel, even though my Singer/Film Star is quite vintage, I added some Distress Spray Stains , wrinkle free distress style. 

Sort of happy with her, but always room for improvement. 


Thursday 2 February 2017

Beautifully sweet.


Here is my latest entry for the Mixed Media Monthly Challenge entitled "Sweet Inspiration"
Being an impulsive soul, it is only 3 days since I created something for their last challenge, but their design team are so inspirational!
I began by gessoing a page in my Girls Annual and drew Emma Watson, actress, copied from a magazine pic.
Next, I chose a selection of sweet colours, inspired by the theme and painted the background first followed by Emma. I used PaperArtsy fresco paints and black stabilo pencil.


Next, using stamps from PaperArtsy Tracy Scott range, ETS01, I stamped with black archival in her hair, this was scary after carefully painting her.
I also stamped parts of the centres onto photocopies of my previous artwork , cut out and glued into the circles. 
Finally, I used Posca pens to scribble here and there and a white uniball pen for a few highlights.

It didn't quite looked finished, so, I stamped around the image with a PaperArtsy Lin Brown sentiment stamp, ELB05, a quote from William Blake. 
A TH bigchat word to finish and I was happy.

Thanks for looking!

This is for this challenge.


Wednesday 1 February 2017

It is love....


When Sue, from Country View Crafts design Team set us the challenge of creating something in 30 minutes or less, I was a bit daunted. Tend to turn things into epic productions and, to be honest, clean and simple is not my thing!
However....managed to create this Valentine Card in 15 minutes.

First, I selected a printed out sheet of a piece of journalling that I had done a while ago and turned it into a chop up sheet.
Using Emma Godfrey's fab stamps PaperArtsy EEG13, I stamped 1 large heart and 2 smaller ones onto my printed work and cut them out. 
I wasted some time creating a colour wash background which was rejected and settled for plain white. 
I stamped the word LOVE and a sentiment in black archival and then just drew around the card with dashes.
Card finished. 
For more ideas, please visit the Country View Crafts Site and maybe enter the competition to win a voucher.